Showing posts with label Pantry. Show all posts

Friday, October 4, 2013

Bake-A-Liciousness: Spiced Apple Chutney & Brie Tartlets

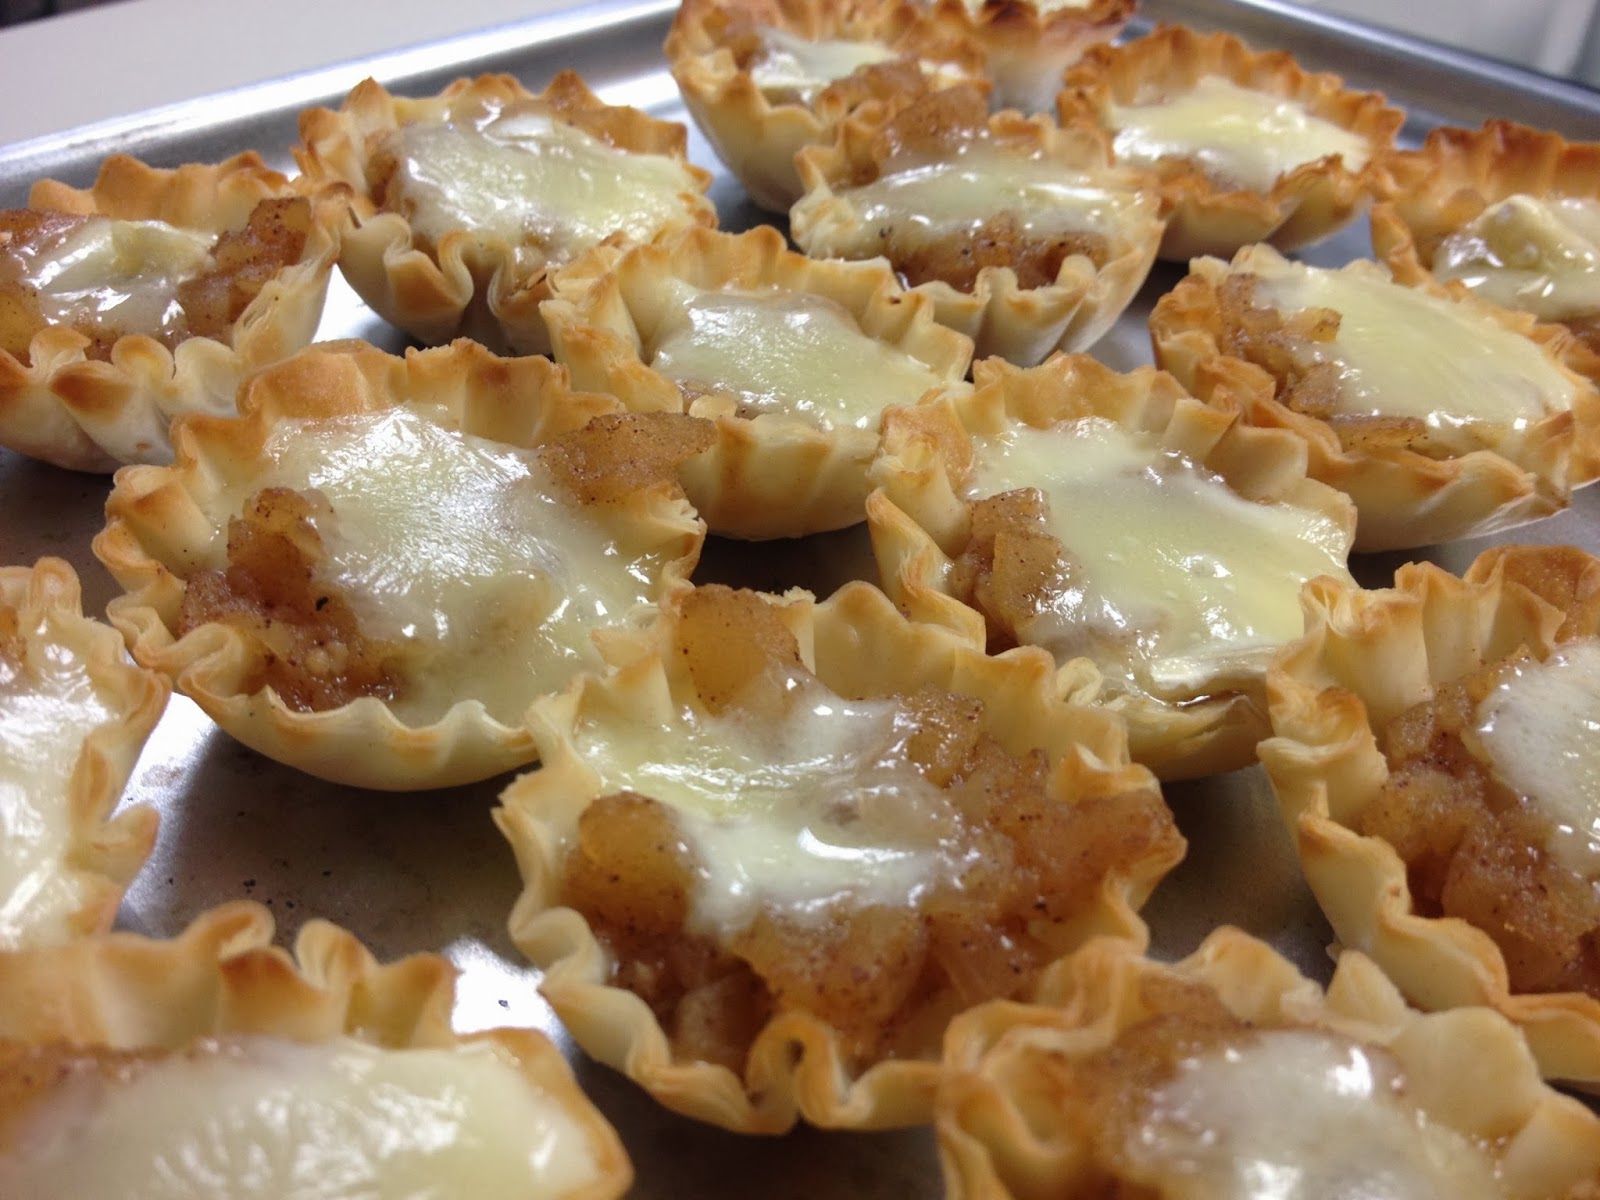
I came up with these delights for a contest at work. I won the contest, but it was because I was the only contestant. Damn coworkers! Anyway, it's a great fall recipe, sweet and savory at the same time. It can also be whipped up days in advance and assembled as needed.

The test batch...YUMMY!

For work I put the Brie on top where you could see it. Either way works.

Spiced Apple Chutney & Brie Tartlets

            
            CHUTNEY:
            1/4 cup orange juice
            1/4 cup water
            3 Tbsp. firmly packed brown sugar
            3 Tbsp. apple cider vinegar
            1/2 tsp. cinnamon
            1/2 tsp. Kosher salt
            1/4 tsp. freshly ground black pepper
            2 shallots, minced
            1/2 jalapeno pepper, seeded and minced
                   or 1 tsp of jalapeño pepper hot sauce.
            1 clove garlic, minced
            2 Granny Smith apples, peeled, cored and finely diced
            2 tsp. Butter

            3-4 Boxes Filo Dough Tart Shells
            1 8oz wheel of Brie, rind removed and cut into ¼ inch squares

Preparation
For Chutney, in small bowl, combine orange juice, water, brown sugar, vinegar,cinnamon, salt and pepper. Mix and set aside.
Melt 2 teaspoons butter in medium saucepan over medium heat. Add shallots, jalapeño and garlic and cook over medium heat, stirring occasionally, until shallots are tender, about 5 minutes. Stir in apples and orange juice mixture and bring to a simmer. Cover and cook over medium-low heat, stirring occasionally, until apples are tender, about 8 to 10 minutes. Remove from heat and let cool.

Assembly
Preheat oven to 350 degrees. Place the tart shells evenly on a baking pan.
Place one square of Brie into each tart shell and spoon a small portion of the chutney over top (Or reverse it if you prefer). Fill each tart shell, but don’t overfill or you’ll have a mess on your baking sheet. Bake the tarts for 5 - 7 minutes or until the Brie is melted. Remove from oven and serve warm.

Tuesday, December 18, 2012

Cookography: Brie, Cranberry & Pecan Tarts

We interrupt this Holiday Season to talk about the last one...Thanksgiving. Yeah, I 'm behind on posts, sue me! Anyway, I am always tasked with bringing a light appetizer to Thanksgiving dinner. It's my lot in life. Also, it's easily transportable. Last year I took the Pumpkin Garlic Bites. They were a huge hit and just the right savory combination of flavors.

This year, I was looking for a baked tart of some kind. I found something along the lines of what I was considering on the web, but it wasn't exactly what I wanted so, as I tend to do...I modified it. Here are Brie, Canberry & Pecan Tarts.

Warm, yummy, sweet and savory

They're incredibly simple to put together and since everyone complains that I never provide recipes, here is a stab at one. Remember, I hardly every use them, so take this with a grain of salt.

          Brie, Cranberry & Pecan Tarts

                    8 T   Chopped Pecans
                    8 T   Chopped Craisins
                    4 T   Honey
                    8 oz  Wheel of Brie
                    30     Filo Tart Shells

         Mix together the pecans, craisins and honey in a small bowl. Add a little extra honey if it's too dry. Here is what that will look like. Everything nicely coated, but there shouldn't be extra honey pooling anywhere.

Yeah, I could just eat this by the spoonful.

Leave it to sit at room temperature while you cut the skin off the brie and cube it into roughly half inch by quarter inch cubes. (Note: I found it easiest to cut the wheel into the half inch cubes first and then simply cut each of those cubes in half and then cut the skin off).

Preheat your oven to 325 degrees and place the tart shells on a non-stick baking sheet. Place a cube of brie in each tart shell and cover with the pecan/craisin mixture. Use all of the pecan craisin mixture. They may look over-filled, but as the brie melts it all fills in nicely. Bake for approximately 10 minutes. Keep an eye on them. I found in order to get things nicely combined I wound up baking them a little longer.

Let them cool a bit before tasting. I got anxious and burned the heck out of my mouth. That honey is hot!!! Even at room temperature they still tasted great. My Mom also just took these to a Christmas Party and they were a huge hit.

One last Thanksgiving thought...I ate too much!

My view of the table.

Monday, November 12, 2012

This is a Test: Winter Mint

Look! A new column!!! Most people assume that the confidence with which I attack my projects somehow means I have any idea how they are going to turn out. Little secret...most of the time I have no idea what the outcome will be. So, I have created the "This is a Test" column for times when I'm relatively sure that the outcome could be way worse than I imagine it to be.

I have always considered mint to be a summer delicacy. Most consider it a weed, for me it's the main ingredient in my amazing Mojitos. Mojito season officially runs Memorial Day to Labor Day for me mainly because that is when the mint flourishes. For some reason, perhaps because temps have been fairly mild here this fall, my mint is still growing.

I've decided to try storing some for the winter. Who knows...maybe I'll have Mojitos on New Year's? Anyway, I did a little research and the 2 most prevalent ways for storing mint are to freeze it inside ice cubes or to vacuum seal it. I've opted for vacuum sealing simply because the packages of finished product take up a lot less space in the freezer than a bag of ice cubes would.

I began by harvesting my mint. I pretty much decimated the plant. Winter is coming and it'll be totally dead soon, I just helped it along. Here is my harvested and carefully selected mint.

Minty heaven in a colander

Once I washed it off and patted it dry, I let it sit for a while. All of the websites said that the mint should be as dry as possible prior to vacuum sealing it. My hands still smell like mint from all the handling I did. I love that! I get the same joy out of handling basil.

I then dug out my trusty FoodSaver machine and sealed up the mint. I think it did pretty well.


FoodSaver in no way paid for this endorsement.
The true test will be when I go to use it. I'll be sure to blog about the first ever Winter Mojito!

Saturday, September 10, 2011

Flava Flave

Once again, it's time to highlight one of my favorite things. This one is newly discovered thanks to The German Host Mom.


She was asking for bouillon, so off I went to the store. I've never been a fan of bouillon. I find it very salty and rarely does it taste like the flavor that it's supposed to.

In the soup section I found these Swanson Flavor Boost packets. They were on sale, so I had to try them. OMG, they are spectacular! It's a liquid, so you don't have to wait for it to dissolve. They have considerably less sale than bouillon cubes AND they taste like what they're supposed to taste like.

She liked using the vegetable flavor on salads and those spectacular green beans she made. I used some of the beef flavor when making my Mushroom and Swiss gravy. NUMMY!

The only product I have ever found that are better than these is…


They are spectacular. However, they can be difficult to find and are a little on the expensive side. Not to mention the fact that once you open them you have to store them in the refridgerator. I don't know about you, but I don't have the space in my fridge to have something in there just sitting around waiting for the odd moment I might need to use it.

The individual packets of the Swanson Flavor Boost can sit in your pantry forever waiting to be used. Then you use a packet and pitch the empty in the trash. HEAVEN!

Monday, January 24, 2011

By The Seat of My Pantry - Meatloaf

Here's another feature I hope to make a regular one. A well stocked pantry is a must for every kitchen. I'll talk more about my pantry itself in a future post.  I often like to challenge myself when it comes to cooking by flinging open my pantry doors (yes, I fling...it's all very dramatic), grabbing 3 or 4 items almost at random and then seeing what I can whip up with them. I call it Off-The-Cuff Cooking ™. I am not a recipe guy. Even when I'm using a recipe that I found somewhere I rarely ever haul out the measuring cups and spoons. The exception to that is baking...it requires a level of precision that my slap-dash cooking style would ruin very quickly.

Last night while I was at the grocery store ground beef was on sale. Knowing that my stock of pre-browned beef was getting low, I grabbed one of those huge 3 pounders and made my way home. I decided to brown half of the beef for future use and the other half I decided to make into meatloaf.

Meatloaf mechanics are pretty basic. You need meat, spices, something gooey to stick it all together and something to add as a filler. Luckily I had eggs in the fridge (almost out of date, but still good). That gave me my goo. Spices also were not a problem, always a lot of those on hand. I had to go to the pantry for the filler. Flinging open the doors I found I had no bread crumbs, no saltines, no stuffing mix. I started to panic a little. You have to put something in meatloaf of a fiber-ish nature or it comes out rock hard like a giant loaf hamburger. There was cereal, but I didn't think Crunch Berries were the way to go. Triscuits? A little too fiber-ish. My eyes came to rest on the box of Wheat Thins Ranch Flavor. Hmm, filler and spices all in one? I grabbed my trusty rolling pin and pulverized the crackers right in the bag till I had a nice fine crumb.

Into the bowl with everything, and then comes my favorite part of meatloaf, getting in there with your hands and mushing (no technical terms in Off-The-Cuff Cooking™) it all together. It reminds of making mud pies when I was a kid. Some people will tell you not to mush your meatloaf too much when mixing. I find the more you mush the better you incorporate your ingredients and the more even your meatloaf turns out. I mush my meatloaf within an inch of it's life!

Another great debate then begins. Should I throw it in a loaf pan or mound it on a flat baking pan? I can go either way on this one. Mounding provides more crusting, if you like that sort of thing. I went with a loaf pan on this occasion, thereby allowing the meat to cook longer in it's own juices making a moister loaf. I also thought the Wheat Thins might need a little more juice to "sog up" than say saltine or bread crumbs might. The "sogging" of the fiber element is very important in meatloaf. If your fiber element doesn't "sog" then you wind up with grainy meatloaf...ick.

Into the oven it went. OMG, I forgot a sauce! Out of the oven it came. Back to the Pantry I went. Saucing a meatloaf is another opportunity to add flavor. You can go the gravy route, the tomato sauce route, ketchup is often a favorite. Once I even used a sour cream sauce that created a Stroganoff Meatloaf...yummmm! I opted for the ketchup, into which I mixed a healthy amount of garlic powder. I then spread that mixture thickly on top of the loaf.

And back into the oven the meatloaf went. Now lets talk about baking. My general meatloaf rule is 350 degrees and a half hour for every pound of meat you've used. That is my rule for the loaf pan. It gets trickier when you mound the beef on a flat baking pan. Depending on the height of your mound you may need to increase or decrease your baking time. Meatloaf really isn't meant to be served rare. or even medium well. A meatloaf should be done, as in cooked through. I use the convection setting on my oven in order to insure that the top cooks evenly and the bottom doesn't burn. I checked on the loaf about 25 minutes into it cooking and noticed that the sauce wasn't cooking up, so I switched the oven over to broil for a couple of minutes to get the sauce bubbling.

Once done, I removed it from the loaf pan and allowed it to rest while I microwaved some veggies. It's important to let it rest for a few minutes. You'll get less breakage when slicing a rested meatloaf than if you try to slice it hot out of the oven. Here is my rested meatloaf.


I love how the sauce caramelized on the top. Also note the consistency in the "grain". That comes from all the mushing. So here is the final plated dinner. I opted for green beans as my veggie. The Hubby loved it and Molly wanted some too. She really is my true gauge. If she doesn't want a bite then we probably shouldn't be eating it either. And yes, I like a lot of real butter on my green beans...don't judge.


Today, I will be making a sandwich with the leftovers. That really is the best part about meatloaf...the leftovers!